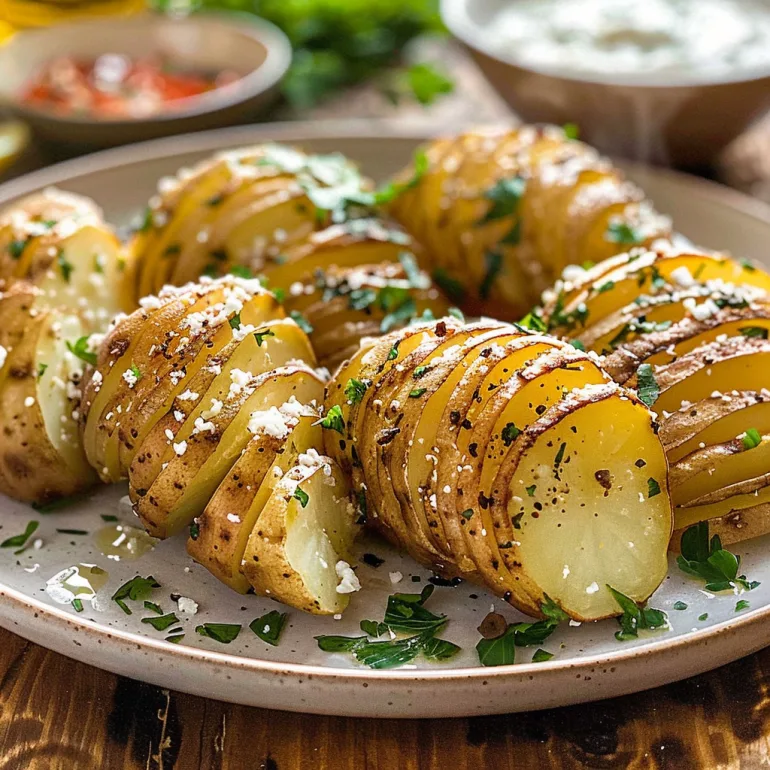
Hasselback potatoes are a visually appealing and delightfully textured side dish that transforms a humble potato into something special. They’re a welcome change from mashed or baked potatoes, offering crispy edges and tender insides with every bite. This method ensures even cooking and a delightful buttery infusion throughout.
Why This Hasselback Potato Recipe Works
This recipe works because it systematically creates layers of crispy potato goodness. The thin, evenly spaced slices allow butter and seasonings to penetrate deeply, flavoring the entire potato. This results in a potato that’s crisp on the outside, yielding to a fluffy interior, and offers a more engaging eating experience than a whole baked potato.
Ingredients
- 4 medium to large russet potatoes (about 8-10 ounces each)
- 1/2 cup unsalted butter, melted
- 2 tablespoons olive oil
- 1 teaspoon garlic powder
- 1 teaspoon onion powder
- 1 teaspoon dried rosemary (or other preferred herbs like thyme or oregano)
- 1/2 teaspoon smoked paprika (optional, for color and depth)
- Salt, to taste
- Freshly ground black pepper, to taste
- Optional toppings: grated Parmesan cheese, chopped fresh chives or parsley, sour cream, bacon bits
Gathering these simple ingredients is the first step toward creating these delightful Hasselback potatoes. The quality of your potatoes will significantly impact the final outcome, so opt for good quality, relatively uniform russets for the best results. The melted butter and olive oil combination ensures both flavor and crispiness, while the seasonings provide a savory base that can be customized to your liking.
How to Make It
- Preheat Oven and Prepare Baking Sheet: Preheat your oven to 400°F (200°C). Line a baking sheet with parchment paper for easier cleanup and to prevent sticking.
- Prepare the Potatoes: Wash and scrub the potatoes thoroughly under cold running water. Pat them completely dry with paper towels. This is an important step for achieving crispiness. It’s important to note that you do not need to peel the potatoes; the skin adds to the texture and flavor.
- Score the Potatoes: This is the signature step of Hasselback potatoes. Place one potato between the handles of two wooden spoons or chopsticks. The spoons/chopsticks will act as a guide, preventing you from cutting all the way through the potato. Using a sharp knife, make thin, even slices across the potato, about 1/8 to 1/4 inch apart. You should aim for at least 10-15 slices per potato. Repeat with the remaining potatoes.
- Melt the Butter and Mix Seasonings: In a small bowl, combine the melted butter and olive oil. Stir in the garlic powder, onion powder, dried rosemary, smoked paprika (if using), salt, and freshly ground black pepper. Mix well to ensure all the seasonings are evenly distributed in the butter mixture.
- Brush the Potatoes: Place the scored potatoes on the prepared baking sheet. Using a pastry brush or a spoon, liberally brush the butter and seasoning mixture all over the potatoes. Make sure to get the mixture down into as many of the slices as possible. You can gently fan out the slices to help the butter seep in.
- Initial Bake: Place the baking sheet in the preheated oven. Bake for 30 minutes.
- Baste and Continue Baking: After 30 minutes, carefully remove the baking sheet from the oven. Spoon or brush any accumulated butter from the bottom of the pan back over the potatoes. Gently fan out the slices again if they’ve started to close. Return to the oven and bake for another 20-30 minutes, or until the potatoes are tender when pierced with a fork and the edges of the slices are golden brown and crispy. You can baste them one more time halfway through this second baking period for extra flavor and crispiness.
- Broil (Optional for Extra Crispiness): If you want even crispier edges, you can carefully place the potatoes under a broiler for 1-2 minutes at the very end of cooking. Watch them very closely to prevent burning.
- Serve: Carefully remove the Hasselback potatoes from the oven. Let them rest for a few minutes before serving. Garnish with your favorite toppings.
Following these steps will guide you to perfectly cooked Hasselback potatoes, boasting crisp edges and tender interiors, ready to be enjoyed with your chosen accompaniments.
You might love this: Easy Garlic Parmesan Chicken Soup Recipe
Nutrition at a Glance
- Potatoes are a good source of potassium, vitamin C, and dietary fiber.
- The butter and oil add healthy fats.
- Seasonings contribute flavor without adding significant calories.
- Overall nutritional value will vary based on portion size and added toppings.
- Russet potatoes, when unpeeled, offer a generous amount of fiber, particularly concentrated in the skin.
- The process of Hasselbacking, while requiring careful slicing, doesn’t inherently remove nutrients from the potato itself, unlike some other potato preparations.
- The butter and oil contribute to the fat content; using a mix or opting for a lighter oil can adjust this if desired.
- Garlic and onion powder are excellent flavor enhancers that are low in calories and offer trace amounts of nutrients.
- Rosemary and paprika add antioxidants and flavor compounds, contributing to the overall healthfulness of the dish in small amounts.
- By controlling the amount of butter and oil used, and being mindful of high-sodium toppings like certain cheeses or bacon bits, you can readily manage the sodium and fat content of your Hasselback potatoes.
- For a lighter option, consider using a good quality olive oil and a reduced amount of butter, or even a blend where olive oil is more dominant.
- The natural starches in potatoes provide energy, making these a satisfying side dish.
- When considering the context of a meal, Hasselback potatoes can be a balanced component, providing complex carbohydrates and some vitamins and minerals.
How to Serve It
- Serve as a side dish alongside roasted meats, grilled chicken, or fish.
- Pair with hearty stews or chili for a satisfying meal.
- Enjoy with a fresh green salad for a lighter yet substantial option.
- Offer as a base for toppings like shredded cheese, sour cream, chives, and even pulled pork or chili.
- These are fantastic on their own with a sprinkle of sea salt and a dollop of herbed yogurt sauce.
- Consider serving them as part of a brunch spread, perhaps alongside eggs or sausages.
- The visual appeal of Hasselback potatoes makes them a great choice for holiday meals or special occasions.
- They stand up well to robust flavors, so don’t shy away from pairing them with dishes that have a strong aromatic profile.
- The crisp texture is particularly enjoyable alongside softer dishes, providing a nice contrast.
- Think of them as a more elevated baked potato, suitable for almost any main course.
These versatile Hasselback potatoes can complement a wide array of main courses, making them a go-to side for many dining occasions.
Common Mistakes
- Cutting too deep or not deep enough: If you cut too deep, the potato will fall apart. If you don’t cut deep enough, you won’t get the signature crispy layers. Using the wooden spoon or chopstick trick is the best way to avoid this.
- Not drying the potatoes: Excess moisture on the potato skin will steam rather than crisp. Ensure the potatoes are thoroughly dried after washing.
- Not getting butter/seasoning into the slices: This is key to flavoring the entire potato. Be generous with the basting and gently fan out the slices to allow the mixture to penetrate.
- Overcrowding the baking sheet: Potatoes need space to allow hot air to circulate around them, which is crucial for crisping. Bake in batches if necessary.
- Underbaking: The potatoes need sufficient time to become tender inside and crispy outside. Be patient and check for doneness.
- Ignoring the optional broiler: While not essential, a quick broil can take your Hasselback potatoes from nicely browned to exceptionally crisp, adding another dimension of texture that many home cooks appreciate.
- Using the wrong potato: While russets are ideal due to their starch content which leads to a fluffy interior and crispy skin, other varieties may yield different results, generally less crispy.
- Not seasoning enough: Potatoes can be bland if not seasoned properly. Don’t be shy with the salt, pepper, and herbs, especially down in the crevices.
- Skipping the basting: While they will still cook without it, basting is what truly imbues the potato with flavor and contributes to even browning and crisping.
- Not allowing the potatoes to rest: Letting them sit for a few minutes after baking allows the moisture in the potato to redistribute slightly, making them easier to handle and preventing them from breaking apart when served.
Avoiding these common pitfalls will ensure your Hasselback potatoes turn out beautifully crisp and deliciously seasoned every time.
Storage and Reheating
- Storage: Once cooled completely, store leftover Hasselback potatoes in an airtight container in the refrigerator for up to 3-4 days.
- Reheating (Oven/Toaster Oven): For the crispiest results, reheat in a preheated oven or toaster oven at 350°F (175°C) for 10-15 minutes, or until heated through and the edges are crispy again.
- Reheating (Air Fryer): Reheating in an air fryer at around 375°F (190°C) for 5-8 minutes also yields excellent crispiness.
- Reheating (Microwave – not recommended for crispiness): While possible, microwaving will make the potatoes soft and lose their crispy texture. If you must use a microwave, heat in short intervals until warmed through, understanding the texture will change.
- Freezing: Hasselback potatoes are not ideal for freezing as the texture changes significantly upon thawing and reheating. It’s best to make only what you plan to consume within a few days.
- Cooling Process: It’s absolutely crucial that the potatoes are cooled completely before being placed in the refrigerator. Warm food can create condensation in the container, leading to sogginess, which is the enemy of well-made Hasselback potatoes.
- Container Choice: When storing, an airtight container is key to preventing the potatoes from drying out too much in the fridge. If you don’t have a suitable container, a resealable plastic bag can also work, just be sure to press out as much air as possible.
- Separating Pieces: If you have multiple Hasselback potatoes, consider placing a piece of parchment paper between them in the storage container to prevent them from sticking together too much, making them easier to separate when you’re ready to reheat.
Proper storage and reheating are essential to preserving the delicious texture and flavor of your Hasselback potatoes.

Leftover Ideas
- Slice the reheated Hasselback potatoes and add them to breakfast hash with eggs and onions.
- Dice the cooled Hasselback potatoes and use them as a base for a hearty potato salad, incorporating mayonnaise, mustard, and chopped celery.
- Cut them into bite-sized pieces and fry them up with some extra seasonings for loaded potato wedges.
- Add them to a frittata or a savory bread pudding for an extra textural element.
- Mash any remaining potato flesh (that might have fallen out or is less crispy) with a little butter and milk to make a quick side of mashed potatoes.
- Use them as a base for a deconstructed shepherd’s pie, topping with leftover meat and gravy.
- Chop them up and mix them into pre-made soup for a thicker, more satisfying broth.
- Get creative with toppings: reheat them and top with leftover chili, cheese, and a dollop of sour cream for a quick loaded potato meal.
- Consider them a component of a “loaded baked potato” bar if you have other guests, offering them as one of the starchy options.
- If you have a small amount left, they can be a wonderful addition to a quick weekday lunch, perhaps alongside some deli meat or a hard-boiled egg.
Don’t let those delicious Hasselback potatoes go to waste; these ideas offer creative ways to enjoy them even after the initial meal.
PrintHASSELBACK POTATOES
- Total Time: 65-75 minutes
- Yield: 4 servings 1x
- Diet: Vegetarian
Description
Learn how to make crispy and flavorful Hasselback potatoes with this easy-to-follow recipe. Perfect as a side dish for any meal.
Ingredients
- 4 medium to large russet potatoes
- 1/2 cup unsalted butter, melted
- 2 tablespoons olive oil
- 1 teaspoon garlic powder
- 1 teaspoon onion powder
- 1 teaspoon dried rosemary
- 1/2 teaspoon smoked paprika (optional)
- Salt, to taste
- Freshly ground black pepper, to taste
- Optional toppings: grated Parmesan cheese, chopped fresh chives or parsley, sour cream, bacon bits
Instructions
- 1. Preheat oven to 400°F (200°C). Line a baking sheet with parchment paper.
- 2. Wash and scrub potatoes, then pat them completely dry.
- 3. Place a potato between two wooden spoons and slice thinly (1/8 to 1/4 inch apart) without cutting all the way through. Repeat with remaining potatoes.
- 4. In a small bowl, combine melted butter, olive oil, garlic powder, onion powder, rosemary, paprika (if using), salt, and pepper.
- 5. Brush the butter mixture generously over the potatoes, fanning out slices to help it penetrate.
- 6. Place on the prepared baking sheet and bake for 30 minutes.
- 7. Remove from oven, baste potatoes with accumulated butter, and return to oven for another 20-30 minutes, or until tender and crispy-edged.
- 8. Optional: Broil for 1-2 minutes for extra crispiness, watching carefully.
- 9. Let rest briefly before serving. Garnish with optional toppings if desired.
Notes
Store cooled leftovers in an airtight container in the refrigerator for up to 3-4 days. Reheat in oven or air fryer for best results.
- Prep Time: 15 minutes
- Cook Time: 50-60 minutes
- Category: Side Dish
- Method: Baking
- Cuisine: American
Nutrition
- Serving Size: 1 serving
- Calories: 350
- Sugar: 2g
- Sodium: 200mg
- Fat: 18g
- Carbohydrates: 45g
- Fiber: 5g
- Protein: 6g


3 thoughts on “Easy Hasselback Potatoes Recipe: Crispy & Delicious Side Dish”