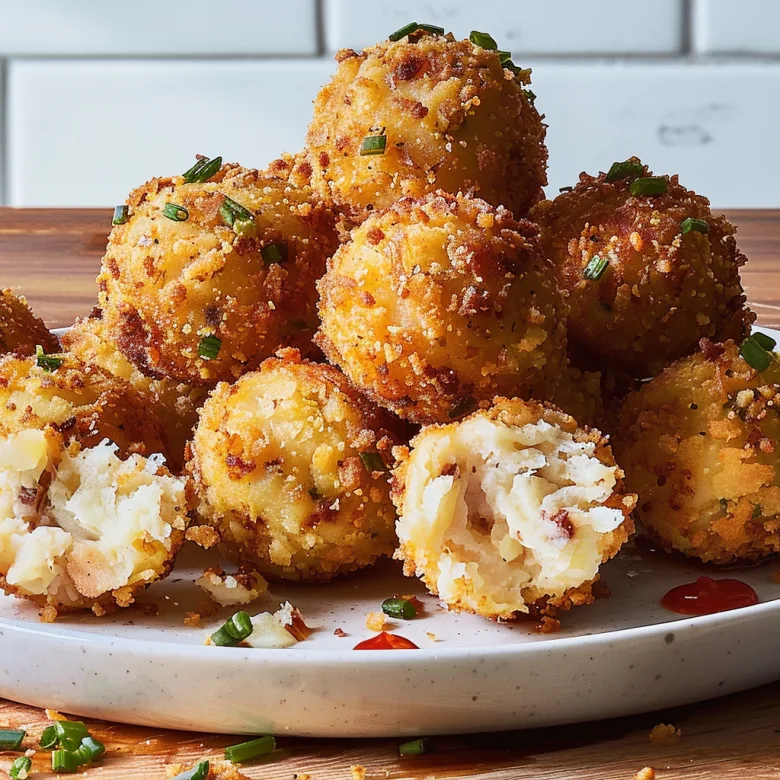
These golden, crunchy potato balls have become my go-to appetizer for family gatherings and casual dinner parties. Made with simple ingredients you likely have on hand, they deliver the satisfying crunch everyone craves with a fluffy, seasoned interior that keeps people coming back for more.
Why This Crispy Potato Ball Recipe Works
The secret lies in using the right potato variety and proper moisture removal. Russet potatoes provide the ideal starchy base, while a quick chilling step ensures they hold their shape during frying. The double-coating technique creates an extra crispy exterior that stays crunchy even after sitting out.
Ingredients
- 2 pounds russet potatoes, peeled and cut into chunks
- 3 large eggs, divided
- 1/2 cup all-purpose flour, plus extra for dusting
- 1/4 cup grated Parmesan cheese
- 2 tablespoons fresh chives, finely chopped
- 1 teaspoon garlic powder
- 1 teaspoon onion powder
- 1/2 teaspoon paprika
- 1 teaspoon salt, or to taste
- 1/4 teaspoon black pepper
- 1 1/2 cups panko breadcrumbs
- 1/2 cup fine breadcrumbs
- Vegetable oil for frying (about 6 cups)
These ingredients work together to create the ideal texture contrast between the crispy coating and tender interior that makes these potato balls so appealing.
How to Make It
- Place the potato chunks in a large pot and cover with cold water by about 2 inches. Add a generous pinch of salt to the water. Bring to a boil over high heat, then reduce to medium-high and cook for 15-20 minutes, or until the potatoes are very tender when pierced with a fork. You want them soft enough to mash easily but not falling apart.
- Drain the potatoes thoroughly in a colander and let them sit for 5 minutes to allow excess moisture to evaporate. This step is crucial for preventing soggy potato balls. Transfer the potatoes to a large bowl and mash them completely using a potato masher or ricer. Make sure there are no lumps remaining.
- While the potatoes are still warm, mix in one beaten egg, the 1/2 cup flour, Parmesan cheese, chives, garlic powder, onion powder, paprika, salt, and pepper. Stir everything together until you have a uniform mixture. The mixture should hold together when squeezed but not be too wet or sticky.
- Cover the bowl with plastic wrap and refrigerate the potato mixture for at least 1 hour, or up to 4 hours. This chilling time helps the mixture firm up, making it much easier to shape into balls and helping them hold together during cooking.
- Set up your breading station with three shallow dishes. In the first dish, place about 1/4 cup of flour for dusting. In the second dish, beat the remaining 2 eggs with a tablespoon of water. In the third dish, combine the panko breadcrumbs and fine breadcrumbs, mixing them well.
- Remove the chilled potato mixture from the refrigerator. Using clean hands, scoop out about 2 tablespoons of the mixture and roll it between your palms to form a ball roughly the size of a golf ball. If the mixture sticks to your hands, lightly dust them with flour.
- Roll each ball first in the flour, shaking off any excess. Then dip it into the beaten eggs, making sure it’s completely coated. Finally, roll it in the breadcrumb mixture, pressing gently to help the coating adhere. Place the coated balls on a baking sheet lined with parchment paper.
- For extra crispiness, you can double-coat the balls by dipping them back into the egg mixture and rolling in breadcrumbs again. This creates an even thicker, crunchier coating that many people prefer.
- Heat the vegetable oil in a heavy-bottomed pot or deep fryer to 350°F (175°C). Use a candy thermometer to monitor the temperature, as maintaining the right heat is essential for achieving the proper texture without burning the coating.
- Carefully lower 4-5 potato balls into the hot oil using a slotted spoon. Don’t overcrowd the pot, as this will lower the oil temperature and result in greasy, less crispy balls. Fry for 3-4 minutes, turning them occasionally with a slotted spoon to ensure even browning.
- The balls are ready when they’re golden brown all over and sound hollow when tapped with a spoon. Remove them from the oil and transfer to a plate lined with paper towels to drain excess oil. Immediately sprinkle with a pinch of salt while they’re still hot.
- Continue frying the remaining balls in batches, allowing the oil temperature to return to 350°F between batches. This ensures consistent results and prevents the coating from becoming soggy or unevenly cooked.
This method produces consistently crispy potato balls with a golden exterior and fluffy, flavorful interior that your family and guests will love.
Nutrition at a Glance
- Rich in complex carbohydrates from potatoes, providing sustained energy
- Contains protein from eggs and Parmesan cheese
- Provides essential vitamins including Vitamin C and B6 from potatoes
- Good source of potassium, important for heart health and muscle function
- Contains fiber to support digestive health
- Moderate calorie content when enjoyed in reasonable portions
- Can be made lighter by using an air fryer instead of deep frying
How to Serve It
- Serve hot as an appetizer with marinara sauce, ranch dressing, or aioli for dipping
- Include them as part of a tapas-style spread alongside other small plates
- Pair with a fresh garden salad for a light lunch or dinner
- Serve as a side dish with grilled meats or roasted chicken
- Arrange on a platter with fresh herbs as garnish for an attractive presentation
- Offer multiple dipping sauces like spicy mayo, herb butter, or cheese sauce
- Include them in a brunch buffet alongside other finger foods
These versatile potato balls work well in both casual and more formal dining situations, adapting easily to different meal styles and occasions.
Common Mistakes
- Using waxy potatoes instead of russet potatoes, which don’t mash as smoothly and can create a gummy texture
- Not draining potatoes thoroughly, leading to excess moisture that makes the mixture too wet to hold together properly
- Skipping the chilling step, which results in balls that fall apart during breading or frying
- Using oil that’s too hot or too cool, causing either burnt exteriors with raw centers or soggy, greasy coatings
- Overcrowding the frying pot, which drops the oil temperature and prevents proper crisping
- Not seasoning the potato mixture adequately, resulting in bland interior flavors
- Making the balls too large, which prevents even cooking and can cause them to break apart
- Pressing the coating too firmly, which can cause it to fall off during frying
Avoiding these common pitfalls will help ensure your potato balls turn out crispy, flavorful, and perfectly shaped every time.
Storage and Reheating
- Store leftover cooked potato balls in the refrigerator for up to 3 days in an airtight container
- Reheat in a 350°F oven for 8-10 minutes to restore crispiness, avoiding the microwave which makes them soggy
- Freeze uncooked, breaded balls on a baking sheet for 2 hours, then transfer to freezer bags for up to 3 months
- Cook frozen balls directly from frozen, adding 1-2 extra minutes to the frying time
- Prepare the potato mixture up to 2 days ahead and keep refrigerated before shaping and cooking
- Shaped but uncooked balls can be refrigerated overnight before breading and frying
- For best results, consume within 2 hours of cooking for maximum crispiness
Proper storage techniques help maintain quality and allow you to prepare components ahead of time for easier entertaining.
Leftover Ideas
- Slice leftover balls in half and use as a base for eggs Benedict for a creative breakfast dish
- Crumble them over soups as a crunchy topping that adds both texture and flavor
- Incorporate into a breakfast hash with peppers, onions, and fried eggs
- Use as a filling for breakfast burritos combined with scrambled eggs and cheese
- Add to grain bowls for extra substance and satisfying texture
- Serve alongside fried eggs and bacon for a hearty weekend breakfast
- Transform into a potato salad by cooling completely and tossing with mayo and herbs
- Use as a substitute for croutons in Caesar salads for an interesting twist
These creative repurposing ideas help minimize food waste while creating new and interesting meal combinations from your leftover potato balls.
Variations and Customizations
One of the great things about this crispy potato ball recipe is how easily it adapts to different flavor profiles and dietary preferences. I’ve experimented with numerous variations over the years, and each brings something unique to the table.
For a Mediterranean twist, try adding sun-dried tomatoes, fresh basil, and a bit of mozzarella cheese to the potato mixture. The combination creates a flavor reminiscent of Italian cuisine that pairs beautifully with marinara sauce. I often make this version when serving alongside pasta dishes or as part of an antipasto spread.
Those who enjoy spicy food will love the jalapeño and cheddar variation. Finely dice 1-2 jalapeños (removing seeds for less heat) and mix them into the potato base along with sharp cheddar cheese. The heat from the peppers balances perfectly with the creamy potatoes, creating a satisfying kick that isn’t overwhelming.
For a healthier alternative, these potato balls work wonderfully in an air fryer. Preheat your air fryer to 375°F and cook the balls for 12-15 minutes, shaking the basket every 5 minutes to ensure even browning. This method reduces the oil content significantly while still achieving a satisfying crunch.
I’ve also had success making a sweet potato version using roasted sweet potatoes instead of regular ones. The natural sweetness pairs beautifully with warm spices like cinnamon, nutmeg, and a touch of maple syrup. These work particularly well as a fall appetizer or even as a unique dessert option.
Troubleshooting Tips
After making these potato balls countless times, I’ve encountered and solved various issues that can arise during preparation. Understanding these solutions helps ensure consistent results every time.
If your potato mixture seems too wet and won’t hold together, don’t immediately add more flour. Instead, spread the mixture on a baking sheet and let it sit uncovered in the refrigerator for 30 minutes. This allows excess moisture to evaporate naturally. If it’s still too wet after this time, gradually incorporate small amounts of flour until the mixture reaches the right consistency.
Sometimes the coating falls off during frying, which usually happens when the balls aren’t properly chilled or if there’s moisture on the surface. Make sure to pat each ball dry with paper towels before breading, and ensure they’ve been chilled adequately. The coating should feel secure before they go into the oil.
When oil temperature fluctuates too much during cooking, the results become inconsistent. Invest in a good candy thermometer and maintain steady heat by adjusting your burner as needed. If the oil gets too hot, remove it from heat briefly and let it cool to the proper temperature before continuing.
If your potato balls come out too dense, you might be overmixing the potato base or using the wrong type of potato. Russet potatoes are essential for the right texture, and mixing should stop as soon as ingredients are just combined. Overworking the mixture develops too much gluten, creating a heavy result.
Seasonal Adaptations
Throughout the year, I adapt this recipe to incorporate seasonal ingredients and flavors that reflect what’s fresh and available. These variations keep the recipe interesting and allow you to take advantage of peak seasonal produce.
During spring, I love adding fresh peas and mint to the potato mixture. The bright green color looks beautiful, and the fresh flavors provide a nice contrast to the rich, fried exterior. Asparagus, blanched and finely chopped, also works wonderfully during this time of year.
Summer calls for fresh corn kernels and herbs like dill or parsley. The corn adds pleasant pops of sweetness and texture, while fresh herbs brighten the overall flavor profile. This version pairs exceptionally well with grilled foods and outdoor entertaining.

Fall adaptations might include roasted butternut squash mixed with the potatoes, along with sage and a touch of brown butter in the mixture. The combination creates a more sophisticated flavor that works well for holiday entertaining and formal dinners.
Winter versions often feature heartier additions like caramelized onions, roasted garlic, and fresh thyme. These deeper flavors complement the season’s comfort food preferences and pair beautifully with heavier main dishes.
Equipment and Tools
Having the right equipment makes preparing these crispy potato balls much easier and helps ensure consistent results. While you don’t need specialized tools, certain items definitely improve the process.
PrintCrispy Potato Balls
- Total Time: 50 minutes
- Yield: 6 servings 1x
- Diet: Vegetarian
Description
Golden, crunchy potato balls with fluffy seasoned interiors. These make excellent appetizers or side dishes that everyone will love.
Ingredients
- 2 pounds russet potatoes, peeled and cut into chunks
- 3 large eggs, divided
- 1/2 cup all-purpose flour, plus extra for dusting
- 1/4 cup grated Parmesan cheese
- 2 tablespoons fresh chives, finely chopped
- 1 teaspoon garlic powder
- 1 teaspoon onion powder
- 1/2 teaspoon paprika
- 1 teaspoon salt, or to taste
- 1/4 teaspoon black pepper
- 1 1/2 cups panko breadcrumbs
- 1/2 cup fine breadcrumbs
- Vegetable oil for frying (about 6 cups)
Instructions
- 1. Boil potato chunks in salted water for 15-20 minutes until very tender. Drain thoroughly and let sit 5 minutes.
- 2. Mash potatoes completely, then mix in 1 beaten egg, flour, Parmesan, chives, and all seasonings.
- 3. Refrigerate mixture for 1-4 hours to firm up.
- 4. Set up breading station with flour, beaten eggs, and mixed breadcrumbs in separate dishes.
- 5. Shape mixture into golf ball-sized spheres.
- 6. Coat each ball in flour, then egg, then breadcrumbs.
- 7. Heat oil to 350°F in heavy pot.
- 8. Fry balls in batches of 4-5 for 3-4 minutes until golden brown.
- 9. Remove with slotted spoon and drain on paper towels.
- 10. Serve hot with dipping sauce.
Notes
Store leftovers in refrigerator up to 3 days. Reheat in 350°F oven for best crispiness. Can be frozen before cooking for up to 3 months.
- Prep Time: 30 minutes
- Cook Time: 20 minutes
- Category: Appetizer
- Method: Deep Frying
- Cuisine: American
Nutrition
- Serving Size: 1 serving
- Calories: 285
- Sugar: 2g
- Sodium: 445mg
- Fat: 12g
- Carbohydrates: 38g
- Fiber: 3g
- Protein: 8g