This vegan creamy white bean chili falls firmly into the latter category. It’s a dish I’ve come back to countless times, especially when I’m craving something hearty, warming, and deeply satisfying, but without any of the heaviness that can sometimes come with traditional chili.
Why This Vegan Creamy White Bean Chili Works
This vegan creamy white bean chili is a success because it masterfully balances creamy texture with bright, savory flavors.
Ingredients
- 1 tablespoon olive oil (or other neutral oil like avocado or grapeseed)
- 1 large yellow onion, finely chopped
- 3-4 cloves garlic, minced
- 1-2 poblano peppers, seeded and chopped (depending on your spice preference and their heat level)
- 1-2 jalapeño peppers, seeded and finely chopped (optional, for extra heat)
- 1 teaspoon ground cumin
- 1 teaspoon dried oregano
- ½ teaspoon ground coriander
- ¼ teaspoon smoked paprika (for a subtle smoky depth)
- Salt and freshly ground black pepper to taste
- 4 cups vegetable broth (low sodium is a good choice to control saltiness)
- 2 (15-ounce) cans cannellini beans, rinsed and drained
- 1 (15-ounce) can Great Northern beans, rinsed and drained
- 1 (4-ounce) can diced green chilies, undrained
- 2 tablespoons nutritional yeast (for a cheesy, umami flavor)
- Juice of ½ lime (adds a touch of brightness at the end)
- Optional: a pinch of cayenne pepper for more heat
- Optional: a bay leaf for simmering
Once you have all your ingredients laid out, you’re ready to start transforming them into a delicious meal.
How to Make It
- Sauté Aromatics and Peppers: Heat the olive oil in a large pot or Dutch oven over medium heat.
- Toast Spices: Stir in the cumin, oregano, coriander, and smoked paprika. Cook, stirring constantly, for about 1 minute until the spices are fragrant.
- Add Beans and Liquids: Add the rinsed and drained cannellini beans and Great Northern beans to the pot.
- Simmer and Meld Flavors: Bring the mixture to a boil, then reduce the heat to low, cover, and let it simmer gently for at least 20-30 minutes. This simmering period allows all the flavors to meld together beautifully.
- Create Creaminess: This is where the magic happens. Remove and discard the bay leaf (if used). Now, you have a couple of options for achieving that delightful creamy texture.
- Finish and Serve: Stir in the fresh lime juice. Taste and adjust seasonings as needed, adding more salt, pepper, or a pinch of cayenne if desired. The lime juice at the end brightens all the flavors and adds a lovely zesty note.
Serving this chili hot, full of developed flavors and that wonderful creamy texture, brings a sense of accomplishment and delicious anticipation.
Nutrition at a Glance
- High in Fiber: The generous amount of white beans contributes significantly to your daily fiber intake, promoting digestive health and keeping you feeling full and satisfied.
- Good Source of Plant-Based Protein: Beans are an excellent source of protein, essential for muscle repair and growth. This chili offers a substantial protein boost without any meat.
- Rich in Vitamins and Minerals: This dish is packed with nutrients from the vegetables and beans, including folate, potassium, iron, and various B vitamins.
- Low in Saturated Fat: Being completely plant-based, this chili is naturally low in unhealthy saturated fats.
- Cholesterol-Free: As a vegan dish, it contains no dietary cholesterol.
- Customizable Sodium: By using low-sodium vegetable broth and controlling added salt, you can easily manage the sodium content to suit your dietary needs.
How to Serve It
- Classic Toppings: Serve hot with a dollop of vegan sour cream or a swirl of plain unsweetened vegan yogurt.
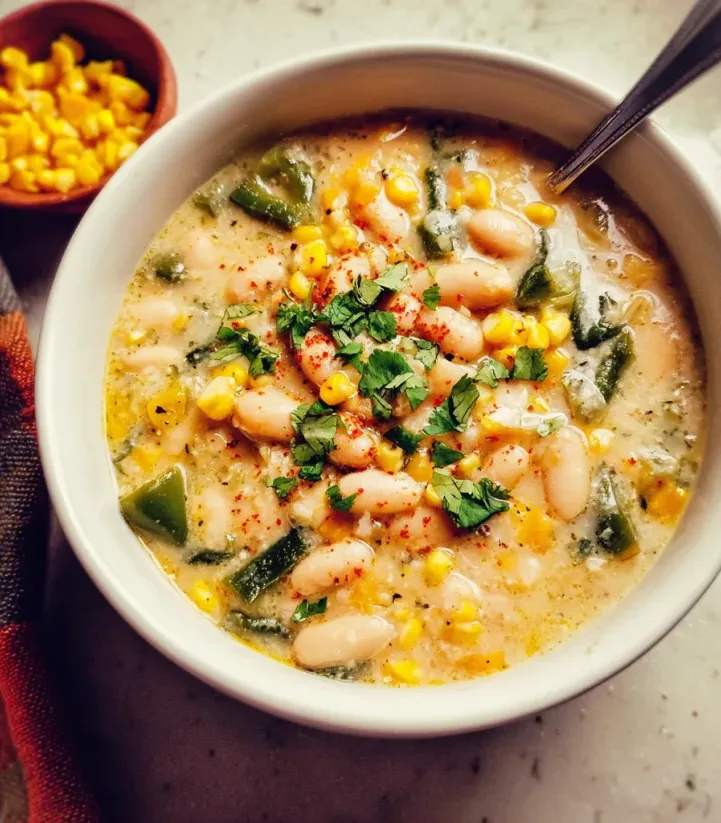
- Fresh Herbs: Garnish generously with chopped fresh cilantro or parsley for a burst of freshness.
- Crunch Factor: Add some crunch with tortilla chips, crushed corn chips, or toasted pepitas (pumpkin seeds).
- Avocado Love: Cubes of fresh avocado or a spoonful of guacamole add richness and a lovely creamy contrast.
- Citrus Zest: A squeeze of fresh lime juice just before serving truly elevates the flavors.
- Spicy Kick: For those who like it hot, consider adding a few pickled jalapeño slices or a drizzle of your favorite hot sauce.
- Serve with Grains: Enjoy a bowl alongside a portion of fluffy quinoa or brown rice for a more substantial meal.
- Bread Buddy: A warm piece of crusty bread or cornbread is also a fantastic accompaniment for sopping up every last drop.
Whatever toppings you choose, they’ll add personality and extra deliciousness to your bowl.
Common Mistakes
- Not Sautéing Aromatics Properly: Rushing the sautéing of the onions, garlic, and peppers means you miss out on developing a deep, fundamental flavor base.
- Burning Spices: Adding spices to a too-hot pan or cooking them for too long can make them bitter.
- Skipping the Simmer Time: While you can eat this chili after a shorter simmer, allowing it to cook for at least 20-30 minutes (or longer) is crucial for the flavors to meld and develop. Impatience here leads to a less complex, less integrated taste.
- Not Adjusting Seasoning: Salt, pepper, and especially the acidity from the lime juice are vital for bringing out the best in the chili.
- Over-Blending: If you’re using a blender to make it creamy, be mindful of how much you blend.
- Using Canned Chilies Without Juice: For the diced green chilies, ensure you use the entire can, including the liquid.
- Forgetting the Nutritional Yeast: While optional, nutritional yeast adds a wonderful savory, cheesy depth that is hard to replicate otherwise. Don’t skip it if you want that extra layer of umami.
Avoiding these small oversights will help ensure a delicious and satisfying bowl of chili.
Don’t miss this delicious recipe: Nourishing White Bean and Lemon Soup
Storage and Reheating
- Refrigerator Storage: Allow the chili to cool completely before transferring it to an airtight container. It can be stored in the refrigerator for up to 4-5 days.
- Freezer Storage: For longer storage, cool the chili completely and then transfer it to freezer-safe containers or heavy-duty freezer bags.
- Reheating on the Stovetop: The best method for reheating is on the stovetop.
- Reheating in the Microwave: For individual portions, you can reheat in the microwave.
- Restoring Creaminess: After reheating, the chili might have separated slightly or lost a bit of its creaminess.
Having this chili ready to go in your fridge or freezer is a true lifesaver for busy days.

Leftover Ideas
- Chili-Stuffed Sweet Potatoes: Spoon the reheated chili into baked sweet potatoes.
- Chili Nachos: Spread a layer of tortilla chips on a baking sheet, top with warmed chili, and bake until heated through.
- Savory Chili Quesadillas: Use the chili as a filling for vegan quesadillas. Spread some of the chili between two tortillas (with or without vegan cheese) and cook in a lightly oiled pan until golden and crispy.
- Chili Over Polenta or Grits: Serve a generous ladle of warm chili over a creamy bed of cooked polenta or grits for a comforting and satisfying breakfast or brunch.
- Chili Burrito Bowls: Combine reheated chili with rice, corn, salsa, avocado, and any other favorite burrito bowl fixings for a quick and flavorful lunch.
- Thickened as a Dip: If the chili feels a bit too thin after reheating, you can simmer it uncovered for a few minutes to thicken it further, making it an excellent dip for vegetables or pita bread.
- Chili Mac: Stir cooked pasta (elbow macaroni or shells work well) into warmed chili for a quick and satisfying “chili mac.”
These creative uses ensure that no delicious spoonful of this vegan creamy white bean chili goes to waste.
PrintVegan creamy white bean chili
- Total Time: 1 hour 5 minutes
- Yield: 6 servings 1x
- Diet: Vegan
Description
A comforting and creamy vegan chili made with white beans, poblano peppers, and savory spices. Easy to make and perfect for weeknights or meal prep.
Ingredients
- 1 tablespoon olive oil
- 1 large yellow onion, finely chopped
- 3–4 cloves garlic, minced
- 1–2 poblano peppers, seeded and chopped
- 1–2 jalapeño peppers, seeded and finely chopped (optional)
- 1 teaspoon ground cumin
- 1 teaspoon dried oregano
- ½ teaspoon ground coriander
- ¼ teaspoon smoked paprika
- Salt and freshly ground black pepper to taste
- 4 cups vegetable broth
- 2 (15-ounce) cans cannellini beans, rinsed and drained
- 1 (15-ounce) can Great Northern beans, rinsed and drained
- 1 (4-ounce) can diced green chilies, undrained
- 2 tablespoons nutritional yeast
- Juice of ½ lime
- Optional: a pinch of cayenne pepper
- Optional: a bay leaf
Instructions
- 1. Heat olive oil in a large pot or Dutch oven over medium heat. Add onion and cook until translucent, 5-7 minutes.
- 2. Add garlic, poblano peppers, and jalapeño peppers (if using). Cook for another 5-7 minutes until peppers are softened.
- 3. Stir in cumin, oregano, coriander, and smoked paprika. Cook for 1 minute until fragrant.
- 4. Add cannellini beans, Great Northern beans, vegetable broth, diced green chilies (with liquid), nutritional yeast, salt, pepper, and optional cayenne and bay leaf.
- 5. Bring to a boil, then reduce heat, cover, and simmer for at least 20-30 minutes, stirring occasionally.
- 6. Remove bay leaf. Scoop out about 2 cups of chili and blend until smooth (using an immersion blender or regular blender). Return to pot and stir to combine for creaminess. Alternatively, mash some beans against the pot sides.
- 7. Stir in lime juice. Taste and adjust seasonings as needed.
Notes
Store cooled chili in an airtight container in the refrigerator for up to 4-5 days. For longer storage, freeze for up to 3 months. Reheat gently on the stovetop with a splash of liquid, or in the microwave.
- Prep Time: 20 minutes
- Cook Time: 45 minutes
- Category: Soup & Stew
- Method: Stovetop
- Cuisine: American
Nutrition
- Serving Size: 1 serving
- Calories: 350
- Sugar: 8g
- Sodium: 600mg
- Fat: 6g
- Carbohydrates: 55g
- Fiber: 15g
- Protein: 18g